Update 2015-07-19: Gitorious is dead. The repo has been forked in GitHub. Links were updated.
As I said in previous posts, I consider Qt Creator a very good candidate for replacing Visual Studio. I believe it has potential to become the IDE closest to perfection.
However, the debugger irritates me. It irritates me the least, but still it needs polishing. But, unlike Visual Studio, I have access to the source code and compiles out of the box (yay!).
Which means I can’t just rant and sit (though my time is valuable).
The Register window
And the winner for the most useless window is…
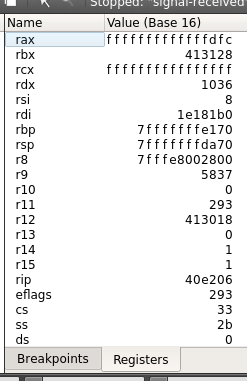
The current register window is crap. I mean, look at it. Most useless window ever. Like Bruce Dawson, I like the debugger to show me huge amounts of information at once.
Copy pasting doesn’t work very well, comparing “ffff” with “fffff” is hard (there are no leading zeroes), numbers keep jumping due to lack of leading zeroes, debugging xmm registers with floating point content is a nightmare. I could go on.One register per row doesn’t cut it. What a waste of space. Specially when we have wide screens. Lots of scrolling going on.
So, in just one day I wrote a new Register window: the Registers “Pretty” window. I beg you to test it a bit before I submit a merge request.
You can enable it like any other debugger window (right click->Registers (pretty)
What’s new?
The pretty window is a read-only text area. So you can select and copy. It relies on Courier New, a fixed-width font, to display everything aligned. You cannot change this (hardcoded in C++) though you can tweak the font size at run time (‘Debugger font size follows main editor’ option must be on)
- Up to four registers per line. 8 & 16 bit registers are shown four per line. If the window is too small, the content wraps. 32 & 64 bit registers are shown two per line, while >64 bit registers are displayed one per line.
- Everything is padded and with leading zeroes. Now it’s easier to compare and visualize. There a few minor exceptions, most notably with registers breaking the name convention (i.e. rax is three letters, r9 is two)
- x87 registers shown in floating point. Now you can see its contents in floating point arithmetic rather than useless hex. It’s contents may be rounded/truncated/corrupted when using full 80-bit precision (I did not test this!) but next to them always the hex representation is shown just in case. Testing of stN register content is appreciated.
- XMM sub-register display. 4 floats per xmm register? Got it! Each fp is shown as xmm00, xmm01 and so on, xmm73 etc. When an xmm register changes, only the sub registers that changed turn red. I don’t remember even MSVC having this feature! Yay!
Here are a few captures of the register window, note that you can have both the old and new register window enabled:
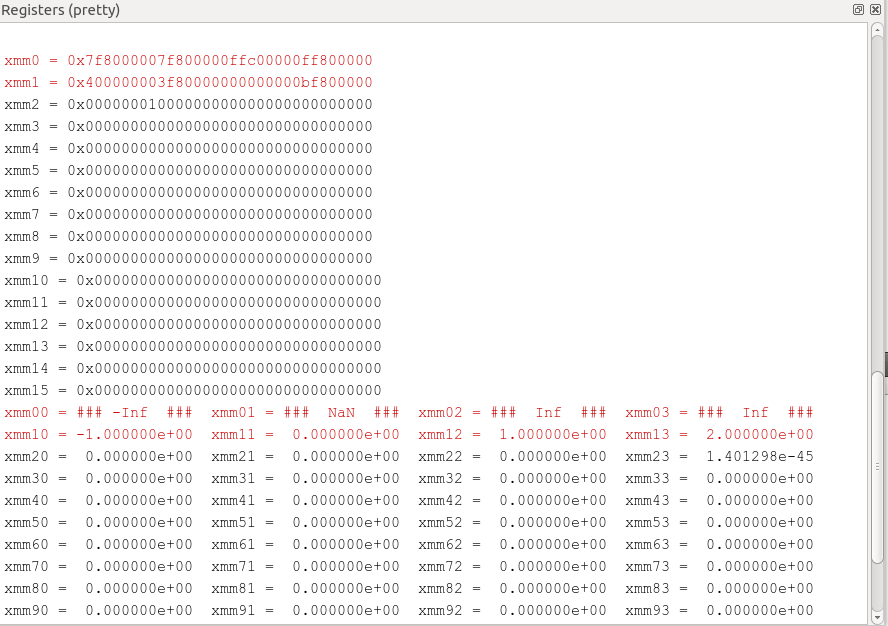
XMM registers and sub-registers in 64-bit mode. It also handles NaNs and Infs (positive and negative)

Partial changes to XMM registers are highlighted only in the necessary sub-registers
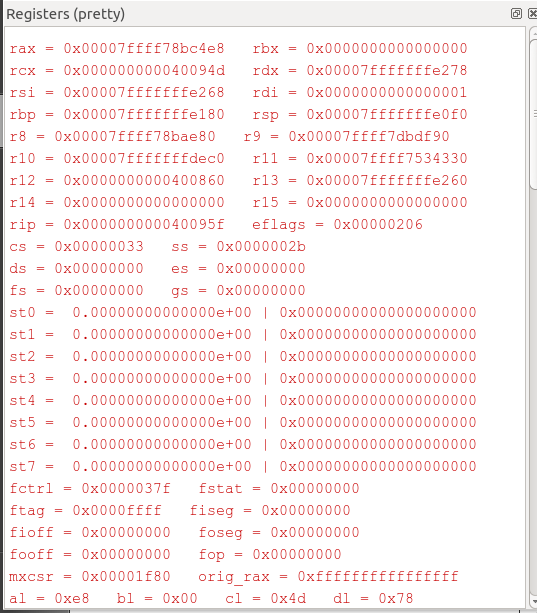
How general registers look like
What is missing?
- XMM double & integer sub-registers. I don’t use them as much, so I focus on what I needed.
- AVX registers. I don’t own an AVX capable machine. You can donate one to me if you wish 😛 ZMM registers means adding support for 16 sub-registers. You can extend the support though. It’s very easy. Look for RegisterHandler::writePrettyOutput function.
- Toggle sub-registers off. XMM sub-registers are always shown.
- On the first break, some xmm subregisters may not be in red, while others are. That’s because there is no data to compare to and the “previous state” is defaulted to zero. Thus if the actual data contains zeroes, it won’t be marked in red (i.e. a minor bug).
- ARM enhanced support. I didn’t try ARM. It should work out of the box, but there is no “enhanced” experienced (i.e. ensuring all registers that are related are displayed together, useful conversions, stuff like that).
Now only one really annoying debugging bug remains in Qt Creator: I like to navigate the “Locals and Expressions” window with arrow keys. But whenever Qt requests more data from GDB (i.e. I expanded an element to see its children), the window is refreshed and though the scroll is retained, the selection is reset to the very first element, so on my arrow key stroke the window scrolls back to the top. I have to use the mouse instead. REALLY annoying.
Let’s hope this contribution makes into the main branch. The debugger really needs care.
Just in case you missed, here’s the repo with source code again.
Can your improved register window handle denormals? I think that would be great feature.
As you know this kind of floats can be very paintful for CPU performance (I think more than Inf/Nan-s).
Next thing. “ZMM registers means adding support for 16 sub-registers”- I guess you mean YMM registers.
Keep posting. I read all stuff from your blog and can’t wait on next useful informations.
I haven’t checked denormals to be honest. That’s a good point. When I’ve got some time I’ll try.
“I guess you mean YMM registers.”. No, ZMM registers. They’re 512-bit wide and come with AVX-512 (no CPU in the market has this capabilities yet, they’re scheduled for 2015).
YMM are 256-bit wide and come with AVX
“Keep posting. I read all stuff from your blog and can’t wait on next useful informations.”
Thanks! It’s hard to keep posting frequently due to other commitments, but I always try 🙂
I like this a lot! Thanks! How do I get this in my Qt Creator install??
1. Download the regular QtCreator from Qt website.
2. Clone the code from the repository (https://gitorious.org/qt-creator/dark_sylinc-qt-creator-debugger-enhancements.git) into your drive.
3. Open project file qtcreator.pro in QtCreator
4. Configure the project if it asks you to (probably will ask you for the location on where to build)
5. Hit Ctrl+B to Build.
6. Wait and you’re done. The binary files will be wherever QtCreator is being built. Launch that executable and you will be using the custom version.
Note that my fork is now behind from the official QtCreator source code, but with a bit of luck merging with the latest changes should give no or barely any merge conflicts.